Accent walls and focal points add dimension and interest to any room. We were so surprised by what we found behind our plaster walls. Restoring the original log cabin timbers from our 1920’s farmhouse created a unique and beautiful wood accent wall. Read on for tips on how to bring beauty back to weathered wood.
When I start a new project it always turns into more work than planned. I planned to give an already white room a fresh coat of white paint. I tend to put in minimal work for maximum visual improvement (i.e. paint everything and anything). John is creative and ambitious and loves to go all out. I’m thankful for his ambition and the beautiful outcome – our wood log cabin accent wall.
When we discovered the almost 100-year-old wood hidden behind our walls, I instantly turned to Pinterest for inspiration. After a few quick searches, I found interesting and educational posts for creating fake wood accent walls. Unfortunately, I did not find anything that told me what to do with a real log cabin wall. These wood timbers were the real deal. Thick, large and full of beautiful imperfections. By looking at pictures of other wood accent walls and classic Wyoming cabins, my inspiration tended towards a traditional log cabin with a modern vibe.
I realize that not many people will be lucky enough to find a real log cabin wall behind their plaster walls and therefore may never follow the exact procedure outlined below. My empty Pinterest searches made it clear that a true log cabin wall is a rarity. However, Pinterest made it very clear that wood accent walls are very popular. Throughout this process, we learned valuable lessons for restoring old wood to a beautiful condition. Hopefully, the steps we performed will resonate with you and inspire you to restore beauty to something in your life .


Wood Accent Wall
Demo day.
Demo day is always fun. The excitement of starting a project is thick in the air, your coffee buzz is fresh and there is no mess or countless hours invested yet. This demo was inspired by a burst of curiosity. What is behind this column? Like I mentioned, I was just planning to throw a fresh coat of white paint on this already white room. We suspected that the pesky column against the wall must be a laundry shoot because there are no supports in the basement below. We decided to remove it. As we started digging in we discovered brick which caused us to pause. We thought, why is there a stack of bricks behind this column with no supports below?


In a bit of a panic, we uncovered the column. This step is when it became apparent that the room we were working on was an addition to the original 1920’s cabin farmhouse. We had a suspicion that the thick walls surrounding the adjacent space were potentially wood. After unveiling this beautiful chevron cabinet supporting the old stack of bricks from the chimney of a wood-burning stove, we decided to go even further.


I was nervous. I had no idea exactly what we would find. We dug into the wall and started tearing away the layers of paintable wallpaper and plaster. It’s fun to see the detailed work of the lath and plaster walls. Although a dusty pain to demo, the plaster construction is impressive. After the lath was removed we were faced with large timbers covered in a chipping layer of white paint. Next step, restoring this rough and neglected wood.
Weathered Wood Restoration
This first step was to remove the old chipped paint. Nothing about this project was glamorous. We made a mess. It was dusty. It was worth it. We began by taking a hand scraper and painfully scraping along the grain and against it to remove the weathered white paint. After making some progress we brought out the power tools. We used both a belt sander with 36 grit sandpaper and an angle grinder to remove the rest of the white paint, smooth the surfaces and get the wood ready to be stained. We used higher grit sandpaper to create a smooth finish as we continued to sand. This was a crucial part of the process of creating a beautiful product.


Although easy to rush through, it’s important to take your time when sanding. This did create a dusty mess but our prep work of hanging plastic helped eliminate the fine dust spreading. Once satisfied with the level of sanding, we vacuumed the space with a shop vac vacuum and wiped down the surfaces with a damp cloth. I have since learned that a tacky cloth would have been more effective at removing the sawdust from the wood.
Staining and finishing the wood
Once the wood was prepped and ready to be stained, the creative process could begin. I scoured Pinterest, analyzing other wood walls, fake wood walls, log cabins, etc. to see what look resonated with me. My goal was to choose a stain color that would eliminate the orange tint of the natural wood. After narrowing down my options to a few different dark stains, I began trying small amounts on the wood where it would be covered by trim. I quickly realized that the dark colors I choose looked significantly darker on these log cabin timbers.


We choose the lightest of stain options and settled on the aged oak gel stain. First, we used rags to apply a thick layer of gel stain to the wood. We wanted to make sure to fill all cracks and imperfections which required a generous amount of stain. As we filled the entire wall, it became apparent that this color was still quite dark. After the wall was completely covered in stain, it looked flat, dark and the imperfections were hidden.
I began to panic slightly (I did not want to re-sand everything). However, John had an idea. We began pouring paint thinner onto clean rags and rubbing down the beams. This tactic removed the excess stain while simultaneously lightened the appearance of the wood beams but leaving dark stain within the cracks and imperfections.


I could not be happier with the results. By removing the excess stain, our wood accent wall went from flat and dull to showing depth and beauty. The imperfections stood out and the dark strain was the perfect color. Next, we applied varnish to the wall. We opted to use an aerosol can of varnish because it was easiest to apply on a vertical surface. The varnish added a soft shine and that brightened the surface of the accent wall. It was also more protected and finished. We had to use more cans of varnish than planned but it was worth it to create the finished product.


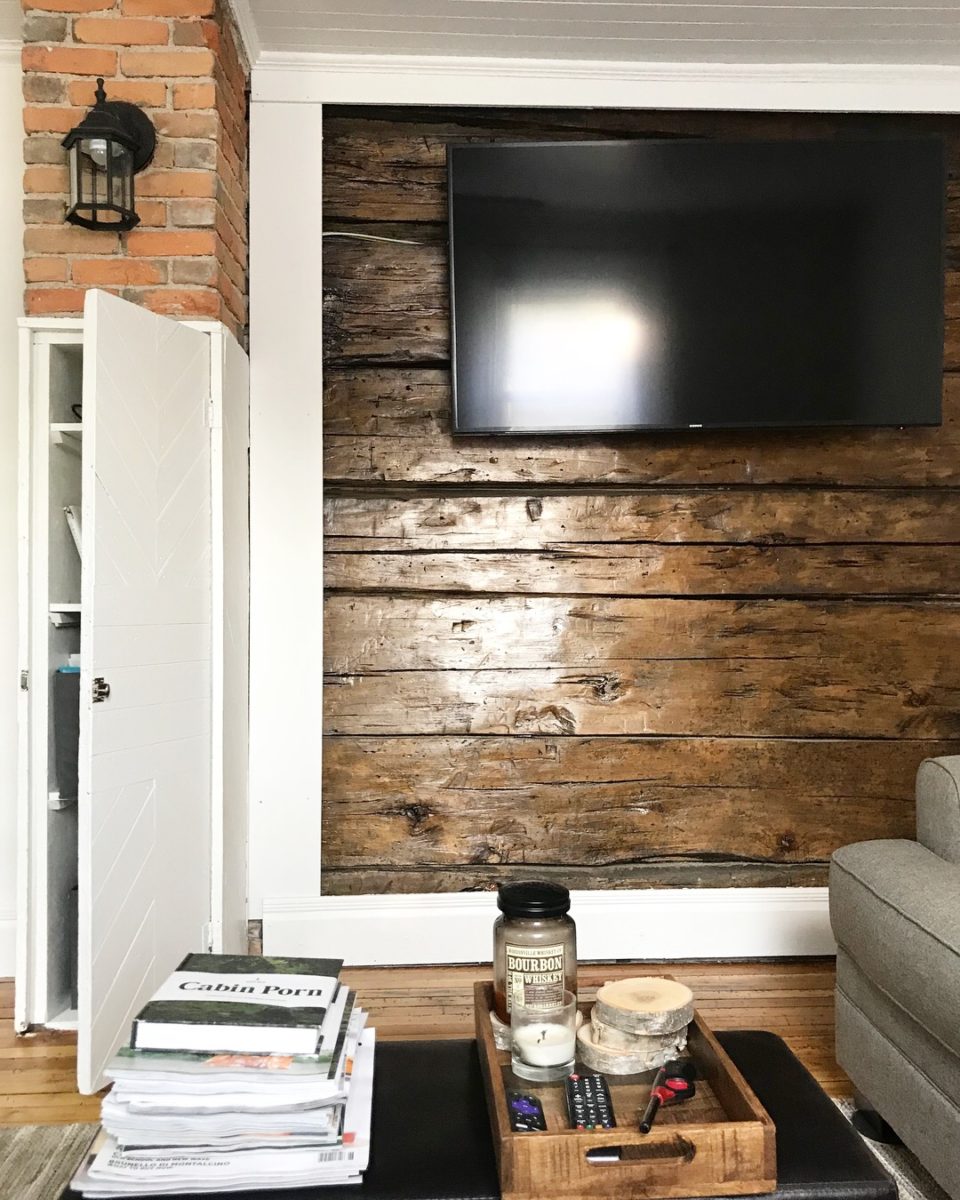
The last step to complete our wood accent wall was to add trim and mount our TV. Due to the unique nature of this wall, we were able to run electrical in between the beams and behind the wood timbers so that no cords are showing behind the TV. The cordless TV, as well as the crisp white trim, created a polished look.
We are so happy with how this wood accent wall turned out. It’s the perfect amount of rustic wood that adds cozy warmth to a room that is otherwise white and simple. More importantly, we were able to expose the 100-year log cabin timbers that had been used to build the original 1920’s cabin. By putting in the effort to restore these original timbers, a piece of our home’s history was preserved.
Tips and tricks for restoring wood
Tools
- Belt Sander
- Angle Grinder
- 36 grit sandpaper
- 80 grit sandpaper
- Tacky Cloth
- Aged oak gel stain
- Staining Rags
- Aerosol varnish
*As an Amazon Affiliate I may earn from qualifying purchases.
These are the products and tools that we used to create the look of our wood accent wall.


Sanding
If the scope of your project requires sanding, be sure to prep the room or area. Hang plastic and try to contain the dust. If your project involves restoring smaller pieces of wood I recommend performing most tasks outside if possible. If you do need to sand inside, there will be dust. Taking preventative measures will help eliminate excessive dust but it will still be a messy project.
Although the condition of our wood wall required us to start by sanding by hand, we first used the belt sander to remove most of the existing paint and then used the angle grinder to help clean up the edges and cracks that were not smooth. For some projects, an orbit sander may be the easiest and most effective tool for sanding the wood surface. An orbit sander works best on flat surfaces which is why we opted not to use it for our project.
Stain
We prefer gel stain for this type of rough wood because it is easier to smooth on to the rough surface. We were able to apply more stain in a location where we wanted more contrast like imperfections and cracks. Our stain choice, aged oak, has warm brown tones and a rustic feel.
Keep in mind that your stain may look different on different types of wood. Lighter surfaces that are more thoroughly sanded will look different than rough surfaces with minimum sanding. Test out your stain in a small or hidden location before applying to the main area of the wood you are restoring.
Apply a generous amount of gel stain to your wood to ensure that all imperfections achieve the desired amount of stain. Lighten surface with a clean, dry rag or rag with paint thinner. This removes excess stain and lightens the surface of the wood while creating contrast as the imperfections remain darker. Before we removed excess stain and wipes our wall down with paint thinner, the dark stain looked very dark and flat. This is an important step to highlight imperfections and create a more dimensional look.
Varnish
Applying varnish is an important step because it finishes and protects your project. This clear coat comes in different finish options. We choose the high glass option for this wall because it reflects the light from the windows on the other side fo the room. Varnish can be applied in different formats but for an accent wall, we prefer the aerosol varnish. Spraying the varnish was easier than using rags or brushes to wipe it onto the rough wood surface and eliminated drips. This final step left the wood shining and beautiful.
Go create.
Restoring our 1920’s log cabin wood accent wall is a project that challenged us and brings us so much joy. We appreciate the history of our home and we’re so happy to bring beauty to such weathered wood. Although wood accent walls are a popular trend, rustic wood is also popular for bar tops, fireplace mantles, shelves, accent pieces and more. By following these steps you can bring beauty back to weathered wood and create pieces that you are proud of. Have you used any of these tactics on a project? Let me know! Comment below and let me know what wood projects you’re working on or save this post to Pinterest and reference it during your next project.


